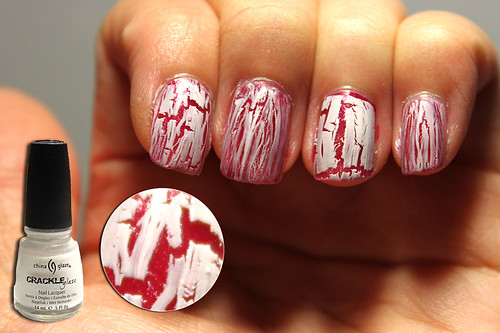
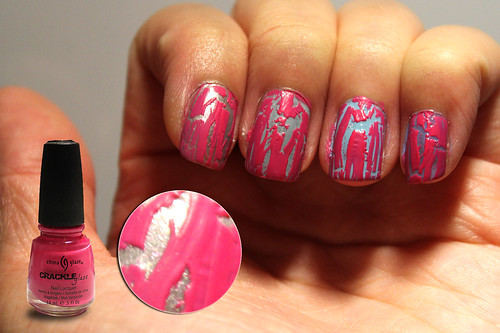
The elusive Crackle Glaze collection - while not limited edition, has certainly proved to be a challenge to get my hands on. But I've finally done it and gotten my hands on the white one (Lightning Bolt) and hot pink one (Crushed Candy).
This is my first ever experience with shatter polish. My thoughts about it are mixed, but let's see the results anyway!

China Glaze Lightning Bolt one coat layered over OPI The One That Got Away from Katy Perry collection, one coat.
I was looking forward to Lightning Bolt more so than the other one because I personally don't quite like black and I wouldn't use OPI Black Shatter if I had gotten it. At that time, Lightning Bolt was the only white shatter in the market, so I was pretty excited. It is sad to find that it was not very user-friendly.
You might note that my index and ring fingers appear to have a more proper crackle effect than my middle and pinkie. I used a thicker coat of the polish on these two. I think shatter polish has a higher tendency to separate in the bottle than normal polishes, so I gave it a mighty good shake before I painted the ring finger, and the brush picked up a better consistency of polish.
Lightning Bolt dries matte but can also be semi-translucent if you don't use a thick enough coat. I personally don't like that effect because it'd look like you smudged some correction fluid onto your nails (but this doesn't look so bad after you apply topcoat). I found that it was more difficult to achieve the crackle effect than Crushed Candy, and less room for mistakes.

China Glaze Crushed Candy one coat layered over:
OPI That's Totally Fort Worth It (I), China Glaze Sea Spray (M), OPI What's With The Cattitude (R), Essie Lapis of Luxury (P)
(I - index, M - middle, R - ring, P - pinkie)
Crushed Candy is definitely way easier to use than Lightning Bolt. As long as you keep to the rules of shatter polish, i.e. try not to go over the same area twice, you'd achieve an acceptable crackle effect. It does seem to crack a whole lot more, compared to Lightning Bolt too, You can definitely see more base colour than LB too! Application wise, Crushed Candy wins.
The downside to Crushed Candy is really finding a base colour that would work with such a hot neon pink. As you can tell, I couldn't decide which base colour to try this out on so I used a variety of grays and blues. I actually like them all. If you're going for a majorly in-your-face effect, I would recommend layering Crushed Candy over something light like a white polish (I tried it over China Glaze Snow), which would really highlight the neon-ness of the pink, or even a light blue like OPI What's With The Cattitude. If you want to go for a more subtle, neutral effect, then pairing it with something beige or silver or gray would work.
In both of these photos, I did not apply topcoat to show that both LB and CC do dry matte, so if you like that sort of effect, go for it. However, I can't vouch for the durability of the polish if you choose not to apply a topcoat, because from what I heard, crackle polish tends to chip notoriously fast without a topcoat. I personally haven't worn either of these as a manicure, especially not when I'm going to start my internship soon.
Some general tips for applying shatter polish:
- Only apply it over dry nail polish. Ideally, your nail polish should be so dry that it doesn't feel in the least bit sticky when you run your finger over it. After all, shatter polish works on the basis of contracting when it comes in contact with a nail polish, so it makes sense that your nail polish has to be as dry as possible.
- Apply only one coat. I found this a little difficult because we all have a habit of running over the same area twice when painting normal polish to make it even, but you'd have to dump that out of the window with this one. I reckon that it'd be a lot easier with OPI's thicker brushes which can definitely help in a one-stroke kill, but not so with China Glaze's smaller brushes. What I did was to apply the first stroke in the middle and then subsequently do the sides (not what I do with normal polishes). There may be some overlap which is inevitable.
- Don't wipe too much polish off the brush before you paint! After trying so many times, I realise that a small dab of the brush on the side of the bottle would be sufficient to remove any extra glob that you don't want messing things up. Do not actually wipe the polish, because when you need enough polish on the brush to cover the entire nail. You don't want to suddenly run out of polish in mid-stroke! (Trust me, you don't.) Beginners might find themselves with thicker crackle coats but at least you get a crackle coat at all. Running out of polish in mid-stroke means fail!
- It usually looks better after a layer of topcoat. Without topcoat, the crackle polish looks like it's just sitting on top of your base. Having a topcoat makes it look more integrated.
Have fun!
No comments:
Post a Comment